DTS OpenID WordPress Plugin
The DTS OpenID plugin for WordPress provides single sign-on through UtahID. As the name suggest, this plugin provides this feature through OpenID, which is an identity layer on top of the OAuth 2.0 protocol.
Note: the following instructions also appear in the plugin settings for your convenience.
Installing
- Installation
- Download and install the plugin on the WordPress plugins page.
- Go to the plugin’s settings (in the settings menu), add
client id, pickOpenID Provider, and selectProtection Level - Activate the plugin (make sure plugin settings are correct because you will be locked out if they are not)
- Important: If you are locked out by some error when attempting to login please contact dts_ui@utah.gov, or open a ticket to DTS – WordPress
- Configuration Options
- Client ID creation
- Note: You will require the help of DTS to create a client if you are not a DTS Employee.
- Go to ApAdmin
- Select “Credentials” at the top
- Create Project
- Note: skip this step if using one project for all sites (pick the project you want instead of creating a new one); Using one project is what the DTS UI/UX team is doing to make admin security access manageable; (DTS UI/UX team: use the project “DTS UI/UX WordPress Sites (Websites maintained by UI/UX)”)
- Click the “create” button next to Project (yes, without even typing in a name… there will be a popup…)
- Type in the title which should be something identifiable like the agency and site name (ie DOH-Maternal-Mental-Health)
- Description doesn’t matter
- For co-owners you’ll want to put in the emails of all the people in your group who should have admin access to the apadmin configuration
- Click create to have the project created
- Create Client
- Next to clients, click the “Create” button
- ApAdmin has the mentality of having several clients for an application (AT/Prod/Dev/etc), but we’ll probably only ever have one and just use that for all environments since apadmin syncs across login.dev and login.dts.*
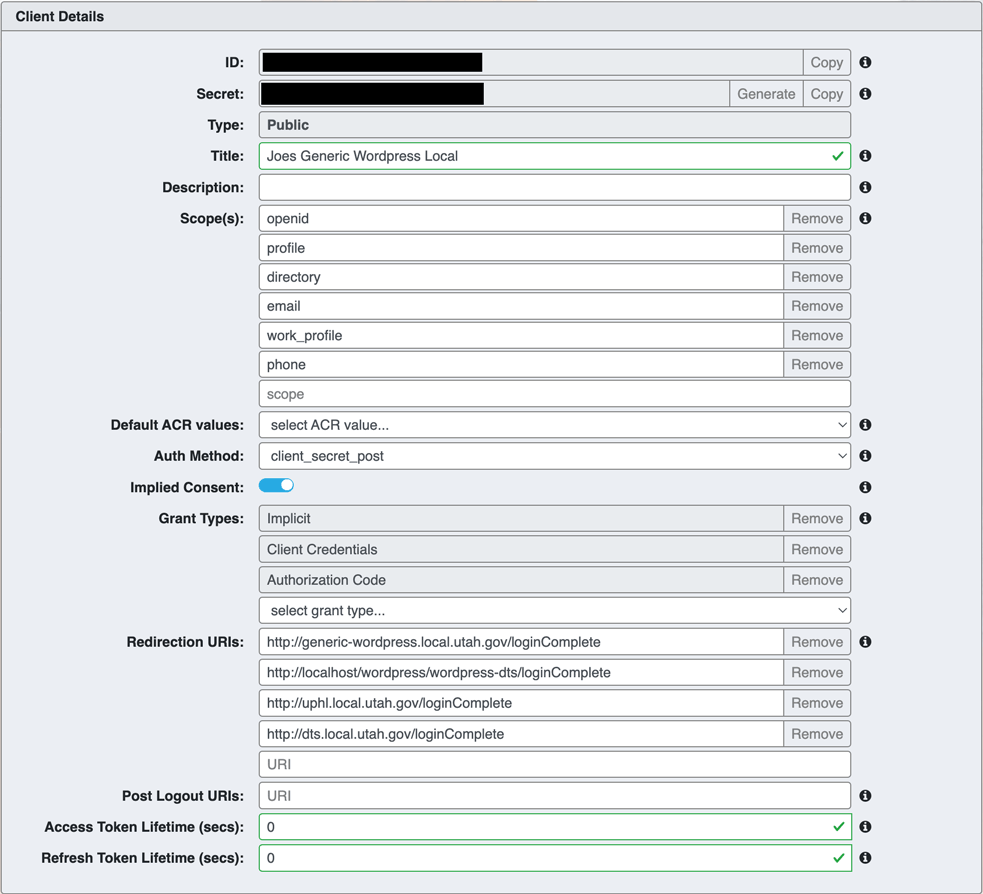
- For the title put something descriptive so you can find it later
- Description is quite irrelevant so be as descriptive as possible Type is
- Add the following four Scopes by typing them individually
on to their own line and clicking the “add” button after each one:
openid,profile,directory,email,work_profile - Default ACR values can be left blank
- Auth Method is
client_secret_post - Implied Consent needs to be turned on. It is on when there is color exposed in the slider. If the color is gray, then it is off. If it’s not gray (orb to the right) then it’s on. Without implied consent then I believe the user is asked if they want to share login information with your site when they first login
- Grant Types are
Implicit,Client Credentials, andAuthorization Code; You just select each one individually to have them added - Redirection URIs is not a fixed value for every site, but
should be
https://[my.website.url]/loginCompletewheremy.website.urlis the base url to your site. For example, if you have WordPress hosted athttps://devnotes.dts.utah.govthen the Redirection URI that you would enter would behttps://devnotes.dts.utah.gov/loginComplete. The plugin uses this url as the destination for OpenID when the login is complete; The plugin is hardcoded to beloginComplete. - Post Logout URIs is blank; The plugin uses the login url’s
gotoparameter instead of the OpenID post logout redirect uri. - Click create to have the client created
Publicwhich is probably the default - A client ID is now generated and is visible at the top of the client configuration; It can be copy/pasted in to the plugin config
- Client ID creation
- All providers are synced through apadmin, so that apadmin changes apply to all of them.
- Protection Level: Determines if OpenID is protecting the whole wordpress site, or just pages that require a wordpress login
- Users who do not have an account on the site will be considered “Anonymous”. Note that the plugin does create 3 Anonymous users for the purpose of anonymous login for General/State/Agency users.
Restricting access via Agency, Division, Unit
Users can be filtered based on their agency, assigned agency, division, and unit.
Division formatting is division#(unit# unit#) division# where division and unit lists are space separated with lists of units in parenthesis after the division number and no space between a division and its units.
Developer access to this plugin's logged in user
This plugin provides both a javascript variable and a PHP custom WordPress hook for obtaining this plugin's determined logged in user. Details can be found in the plugin settings screen.
- Customer Contact: DTS UI/UX (dts_ui@utah.gov)
Technologies
- PHP
- WordPress
- OpenID
Versions
- 2.7.4 - Log error messages
- 2.7.3 - Fix - Crash in PHP 7.4
- 2.7.2 - Fix - Update agency matching
- 2.7.1 - Update login account matching
- 2.7.0
- Force https for login url.
- Remove option: openid provider url. Login now always uses the production login url.
- 2.6.0 - Allow WP Engine to perform platform, plugin, and theme updates
- 2.5.3 - Allow WP CLI to run on sites that are protected
- 2.5.2 - Fix 404 errors for plugin resources
- 2.5.1 - Allow for no selected agency when saving settings
- 2.5.0 - Deny access to the plugin directory, and update the documentation about the OpenID User Utility
- 2.4.1 - Filter users also by Unit:
Users can be filtered based on their agency, assigned agency, division, and unit.
Division formatting is "division#(unit# unit#) division#" where division and unit lists are space separated with lists of units in parens after the division number and no space between a division and its units.
- 2.3.1 - Fix plugin URL
- 2.3.0 - Add two agencies to the list: DHHS and GovOps
- 2.2.0 - Add Setting for limiting users based on Agency
- There is now a setting for "Allowed User Groups" that limits which anonymous user types are permitted to access content (all, state, agency)
- (BREAKING) It is now required for the apadmin client to have the scope of
work_profileadded; Please go to apadmin, open the client for this app, and add the scopework_profileto the scopes list. - Two WordPress roles will be created (if missing) when this plugin's settings are saved
- New Role -
OpenID - Agency: This role is used by theOpenID - Agency Useruser - New Role -
OpenID - State: This role is used by theOpenID - State Useruser
- New Role -
- Three WordPress accounts will be created (if missing) when this plugin's settings are saved
- (BREAKING) New User -
OpenID - Anonymous: The logged in user is not a state account; This plugin used to use theState of Utah - Anonymoususer, but will now create and use this new user. TheState of Utah - Anonymoususer will not be automatically deleted. - New User -
OpenID - Agency User: The logged in user has one of the agencies picked in this plugin's settings. - New User -
OpenID - State User: The logged in user does not belong to one of the picked agencies, but the user is a state employee.
- (BREAKING) New User -
- It is possible for a user to belong to an agency (ie DTS) but be assigned to another agency (ie DEQ); The setup for this is managed by the Help Desk, but this plugin will honor a user's "Assigned Agency" as well as their actual agency.
- This plugin now adds a WordPress custom hook and global Javascript variable that provide details about the currently logged in user's agency/division information. This allows custom code to access information about the current user's agency/division and know if the user is a state employee account. See the above "Developer access to this plugin's logged in user" section for details.
- When a user fails authentication they are shown a 403 page. Your theme's
403.phptemplate file will be used. If it does not have one, this template provides a basic default 403 page.
- (FIX) After login, the user is now redirected back to where they were intending to go.
- 1.1.2 - Close session after starting session when redirecting during login
- 1.1.1 - After login, redirect to home instead of admin for non-admins
- 1.1.0 - Redirect wp-login.php to UtahID Login; Add firstname/lastname on account creation
- 1.0.0 - Initial release
Authors
- Department of Government Operations: DTS Digital Experience Team